How To Use A CS:GO Config & Autoexec

Posted on September 15, 2019

In CS:GO, you can use the console to configure a plethora of different options. The possibilities are endless.

One major nuisance about this is that a lot of the options are reset when the game gets restarted. So you have to type them again, which is, unsurprisingly, not optimal.

To avoid this, you need to create an autoexec file. This is basically an automatically executed configuration file with the options you want to have, such as your crosshair, buy binds, etc.

It’s really easy to create an autoexec file and the cool thing is that you can use the config of pro CS:GO players very easily as well.

How To Create And Use An Autoexec File

We recommend that you use Notepad++ for this. It’s the best and one of the most popular text editors out there and we’re sure you’ll like it. It’s 100% free too!

Here’s how you create and use a CS:GO autoexec config file. You should install Notepad++ before starting.
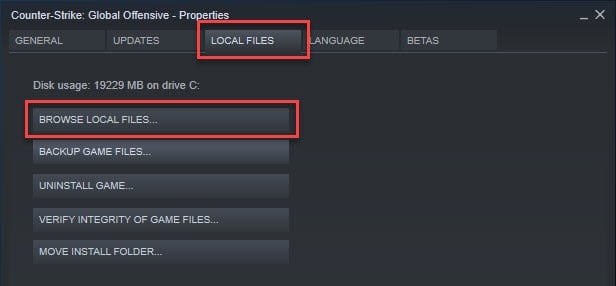
  1. Open up Steam
  2. Right-click on Counter-Strike: Global Offensive
  3. Click on Properties
  4. Click on Browse Local Files
    Cs Go Browse Local Files
  5. A new Windows Explorer window should open up. Navigate to the csgo folder and then on the cfg folder.
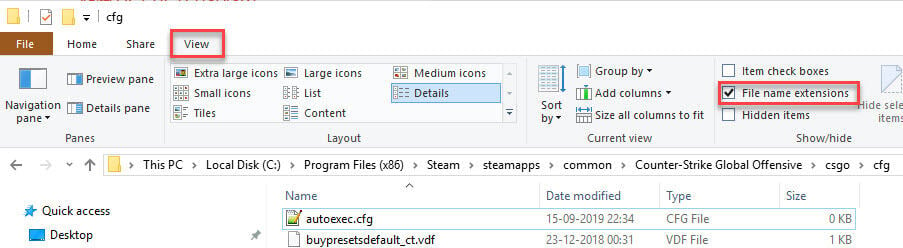
  6. Create a new file here and name it autoexec. Be sure the extension is .cfg
    Autoexec
    If you can not see file extensions, then see the image below on how to enable file extensions in Windows 10.
    Autoexec CS GO Config
  7. Open the program with Notepad++ (if you haven’t installed it, then just open it with Notepad)
  8. Now enter all your commands that you want to be executed at the start of every launch. Separate each command with a new line.
    You can use a CS:GO autoexec generator to help you.
  9. When you are done, add host_writeconfig at the end, in a separate line. The autoexec generator above already does this.

And you’re good to go! The commands in the autoexec config file will now be launched every time you launch CS:GO.

How To Use CS:GO Pro Players Configs

It’s very easy to use the configs of pro CS:GO players. Simply follow these instructions:

  1. Download the desired player’s config file. It is typically a .zip file containing a config.cfg and an autoexec.cfg file.
  2. Navigate to your Steam folder (typically C:/Program Files (x86)/Steam)
  3. Now navigate to the userdata folder and then navigate to the folder that matches your Steam ID. If you don’t know what your Steam ID is, then follow the steps below and return once you have it.
  4. Navigate further to 730/local/cfg
  5. Take a backup of your current config.cfg file (always recommended) and then insert the config.cfg file you just downloaded.
  6. You can also go insert the autoexec.cfg file, but not here. Follow the instructions above to find that folder.

How To Find Your Steam ID

It is not always straightforward what your Steam ID is. Here is the simplest way of getting your Steam ID.

  1. Inside Steam, click on your Steam username tab.
  2. Enter the URL on the Advanced tab here
  3. Click on Get SteamIds.
  4. The site will then output your Steam ID as the first thing.
    It will be in this format: STEAM_1:0:XXXXXXXX
    The last part is your Steam ID.

Submit A Tip

Are we missing something or has something changed? We would be happy to hear your feedback and tips!

Thanks For The Tip!

The form will close now. Have a nice day :-)